When it came to the hour where I had to stop puttering (which for the record, I LOVE- and am very good at, haha.) I came to a dinner dilemma. We, the hubby and I, had gotten ground chuck earlier in the day to have grilled hamburgers- but what had sounded good earlier was boring the hunger out of me now. You know the feeling, I know it happens to others, too! So- what to do at this late hour when the hubby has heard me moving around the kitchen and has that expectant, "I'm going to get to eat soon" look on his face.
While rooting through the cupboards, looking for inspiration, I found an relatively unused culinary toy- the stuffed hamburger maker-.relegated to a lower cupboard. I had bought it a couple of years ago- used it unsuccessfully, once. I pulled it out and thought, honestly.... "Blog post! Let's see what this baby is capable of". So here goes.
I took the package of ground chuck, seasoned it with salt and pepper and "fluffed" it up a bit. On the first burger, I used the maker the way that I remembered the instructions (limited as they were) had told me to do.
1. Make a thin beef patty and place it in the bottom of the maker.
2. Twist the maker handle to the indent position and press down, hard.

3. Place the stuffing ingredients into the indentation.
In the hubby's case- pepperoni and mozzarella cheese.
4. Add ground beef to the top of the patty, covering all of the stuffing, and twist the maker into the "smush" mode, and press down firmly to seal.
Okay- so I did all of that, and wasn't displeased with the result. It was a thick burger, but was sealed on all sides. When I made them the last time, all of the stuffing ingredients oozed out during the cooking, and the result was disheartening- so I was determined not to repeat that again. I have to admit that while I was working, I was also determining what the garage sale price of this gadget would be should that be the result again.
Next onto my burger. I tend to be much more adventuresome with my taste flavors and I once again went through the fridge and the cupboards looking for inspiration. What I found? Pesto, feta cheese, and for some fun.. a couple of leaves from my purple and green basil plants. (More on my spectacular simple herb garden and self watering patio box in a later post.)
In order to fine tune the burger technique, I modified the original with the following:
1. I crumbled the beef into the bottom of the maker, and then pressed down in the indent mode. Much easier and I got a better indentation.
2. I made the indentation a little deeper by finger pressing some of the beef up the walls.
3. Added a thin layer of the pesto, feta cheese and layered on the basil leaves.
4. Crumbled on more of the ground beef- making sure to cover all of the stuffing mixture.
5. Use the "smush" mode, firmly, to seal all of the burger.
This one sealed better and more firmly- but was still really big. Some fresh ground pepper on the top and I sent them out to the hubby to grill. He is the grill master!

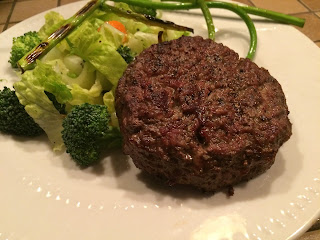
This is how they came out- grilled to over 165 degrees- and the stuffings were still well contained in their burger casings! Yeah!
This is how I plated mine, as much as I would have like a bun- I had already eaten my gluten rations this morning... sad, sad, sad.
This is how the hubby's looked.
They were umm,..... Yummy.
And the taste- ummm, Really Yummy.
I am officially a fan, and this little gadget gets a special place in the summer kitchen. This Friday, I'm thinking that it is not so much a pizza on the patio- but a stuffed burger. What stuffing mixture? Oh, let me count the ways! Lots to plan before Friday's patio adventure.
So let me know what your dream stuffing mixture would be- you might see a picture of it later on
here.. And who knows I may choose someone to send your own maker....
Keep grilling- it's the summer and...
Live Peacefully. Cook Fearlessly.
Chris


How did I miss this post? This looks so cool!
ReplyDelete