Mar 28, 2016

Who cares which one came first?...Deep fry those little devils!


It was probably about a week ago when I first heard about this bit of outrageous deliciousness from a co-worker. Ready?
Deep fried deviled eggs!
I was immediately intrigued by the thought and since Easter was coming up, well- I had the perfect excuse to try them out!
After buying the eggs, I boiled them and shelled them- only lost just a few to horrible peeling. LOL
(A quick tip about peeling eggs my mom told me is to drain the boiling water, carefully, and then crack all of the eggs by swirling the pot, and add cold water over the eggs. Let them sit for a few minutes and the shells will usually peel right off!)

After halving them and putting the yolks in a separate bowl, I started working on the deviled part.

To my bowl of eggs I like to add some spice. Usually I change it up depending on how I feel that day, but for this I went with some standard favorites: mustard, cider vinegar, salt, pepper, garlic powder, onion powder, dried mustard powder, celery seed, dried dill, and mayonnaise.
I never really measure the amounts I put in, I start mashing, and tasting, and adding, and mashing, tasting, and adding.. until it is yummy.


Putting the filling in the refrigerator, I turned to the deviling and frying part. According to my co-worker, he uses a flour/egg wash/breadcrumb coating. I started with the same, but changed to panko breadcrumbs because I like them better. Let me tell you - I had 18 people to feed, and had boiled three dozen eggs, now I had to bread 72 halves! I was frustrated after number two, for a couple of reasons. First- egg whites are delicate little flowers and don't really like to be picked up and dredged. LOL Secondly, the fingers that are dredging are immediately cased in flour and egg paste- getting larger with each dredge- I had to stop multiple times to de-bread my fingers!
However, I finished them while the deep fryer was reaching temperature, (I set it at 375 degrees) and there started to be a promise of deep fried goodness in the air.
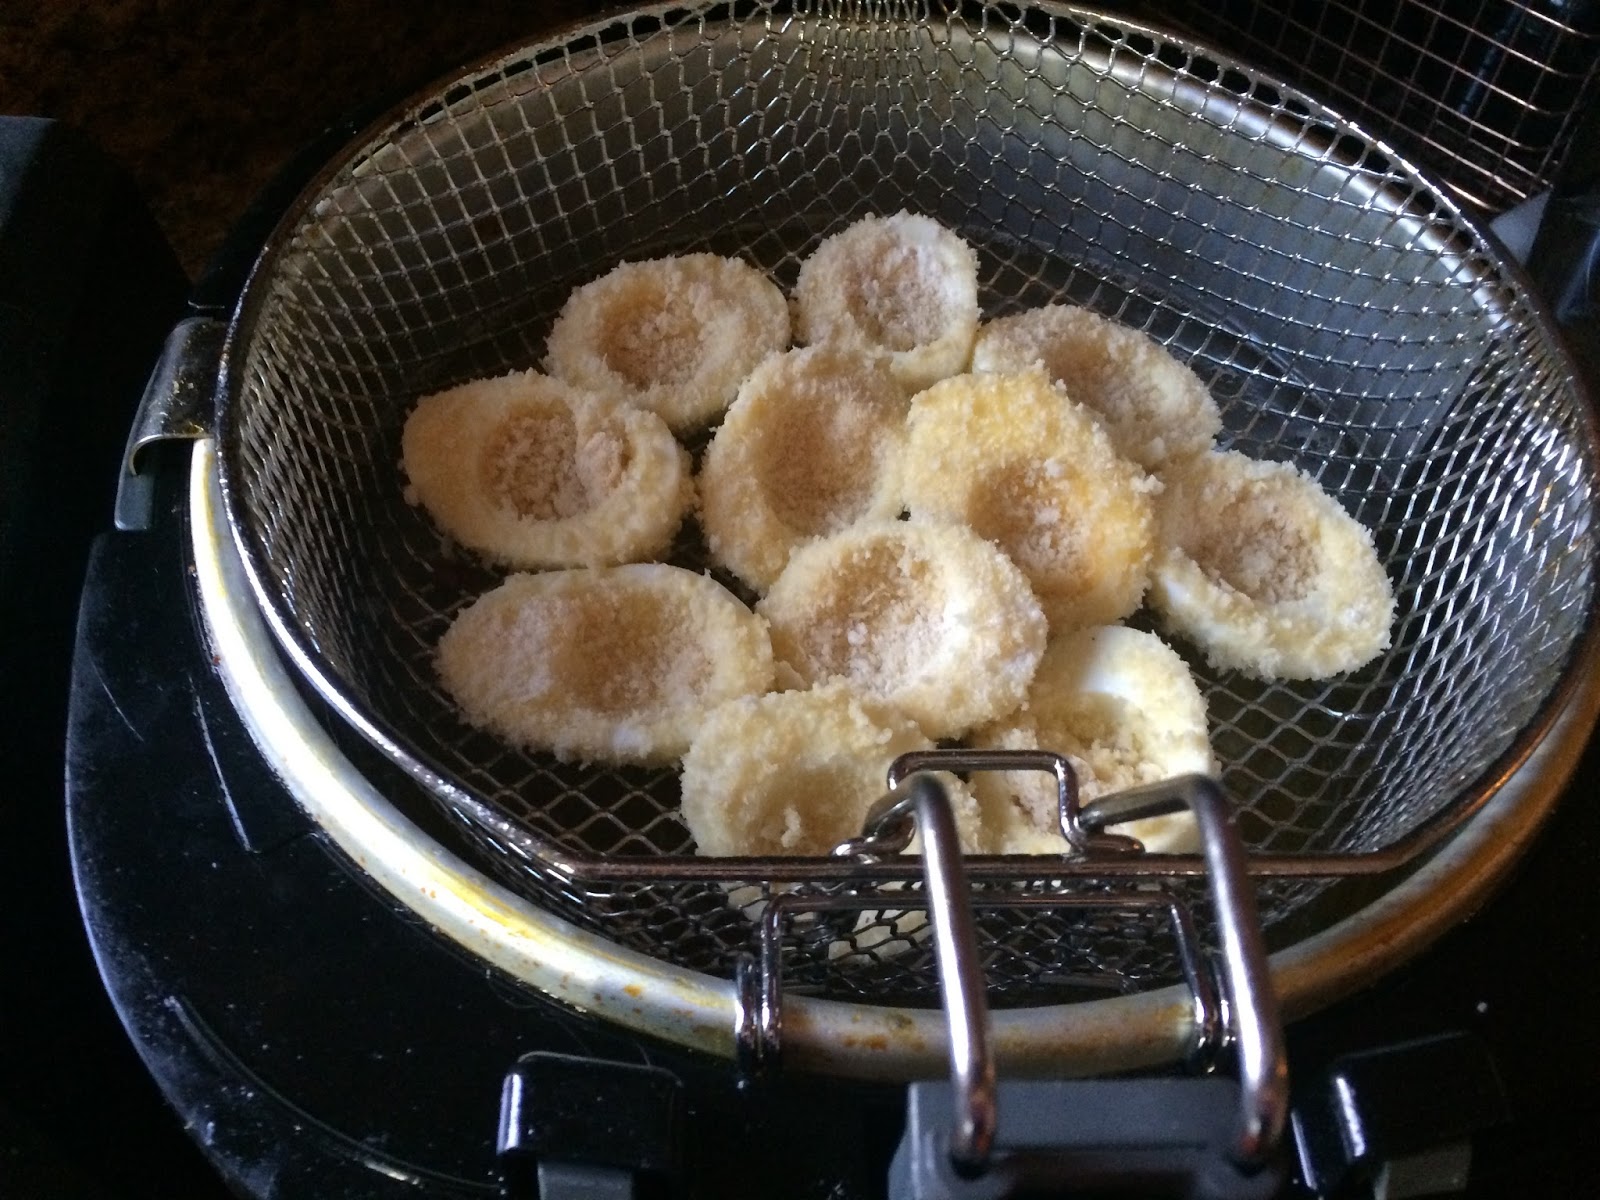
Setting the first batch in the basket, I slowly lowered them into the fresh oil...
Five minutes of anxious checking later I had this...
It was a start, and they were so crispy! The breading was beautiful golden. Working in batches, I put the deviled filling in a pastry bag and started piping in to the crusty shells. So pretty if I do say so myself!
Here is a close up of them so you can see the texture.
I decided to add some toppings: jalapenos, paprika, dill, sea salt, and a balsamic finishing vinegar. (Haven't heard of them before? keep looking for my next blogs- I was gifted with a bunch of them! yeah!) 
After rushing them warm to the Easter dinner (these were the appetizers), I FINALLY got to try one.......YUM!  Crispy and golden on the bottom with the rich filling, and the tang of the topping. My dad declared them a winning recipe, and a new staple for the big family dinners! I may have created a bit of a monster.  A big thank you to Sim!
Next time I might try a beer batter on the whites, easier to do. will keep you all updated on the results Anyone out tried the batter fry on these? Let me know.

So go on out and try these yourself- I would love to hear how yours turn out.

Update on the book- still in the potential agent's hands... Two weeks down, and turn around time is about six weeks. I am trying hard to learn patience. LOL But I console myself each day that at least I haven't gotten a rejection yet. Haha

Follow your dreams everyone, and as always:
Live Peacefully. Cook Fearlessly.
Chris


Mar 21, 2016

You bake me right round baby, right round....

Today, while I was procrastinating about writing a paper for the college course I am taking, I ran across this little gadget I found a few years ago- and promptly buried in my closet of "I'll fool around with this later" kitchen clutter.  
Thinking that this would be a great blog entry, I promptly turned off the laptop (and my Paper), and got to work on figuring this thing out. It had not come with instructions but I was able to find some on the Internet a few years ago, and they were still in the box.


Following the package recipe (word for word) for the French bread, well, that wasn't going to happen. So I modified it all to heck, adding rye flour, white whole wheat, and a 12 grain add in. Fourty-five minutes later, I tugged,  and shaped, and got the dough into the glass container.


Another bit of a raise and into the 425 degree oven it went. (That was a bit nerve racking- hot oven and cold glass thing). But after following the directions on timing, 20 minutes later I had this.                                                                       
Following the directions in order to get it out of the tube... well that was a whole another level of frustrations and a minor burn!


I let it cool a bit and cut into it.


What coolness!
                                                                                                                     

But what to do with it now,- cool toast, appetizers?  While looking around I saw my other favorite kitchen gadget- the Breakfast Sandwich Maker- and an idea popped up!


I added sliced chicken, provolone and pepperoni to the left side: provolone, jalapenos, and tuna salad to the right.


Toasted them for 4 minutes, and

Yummy Goodness.


Here are the finished sandwiches:

They were very good!  And such fun to eat!  So if you stumble across the Pyrex "Bake-a-Round" snag it up for yourself or your favorite baker...
Here's a site that helped me with some new recipe ideas.
http://neufie.com/bake-a-round/

Now, sadly, back to the homework...

As always,
Live Peacefully. Cook Fearlessly
Chris


Mar 20, 2016

Move over Leg of Lamb-- This Garlic/ Mustard/Rosemary Baguette Bread is the new Classic!

Happy Spring Everyone!
Today, I was at a spring celebration and wanted to create a bread that went with a friend's lamb dish. Well, actually that was Plan B- Plan A was to make Lamb/Rosemary/Garlic/Dijon mustard sausage that was inspired by Julia Child's traditional mustard-sauced Leg of Lamb. Sadly, due to a minor miscalculation of mine- who would have thought it?, the lamb was wasn't defrosted in time... so that will be tomorrow's post.
So-- I thought, why not take that fabulous mustard sauce and make it the basis of a French baguette? Classic! Plus I recently acquired some new baguette shaping pans from vacation, and wanted to get in some more time with them. Here is the results:

Do they look Yummy or what? And you know it-- they tasted out of this world. All warm garlic-y, mustard-y goodness.
The Basics:

2 cups of warm water
2 tbsp white sugar
2 packages (2 tbsp) of yeast
1 cup rye flour
1 cup white whole wheat flour
4 cups of bread flour
1 tbsp mustard powder
1 tsp onion powder
1 tsp garlic powder
1 tsp dried minced garlic
1 tbsp sea salt
2 tbsp yellow mustard
2 tbsp Dijon mustard
2 tbsp chopped fresh rosemary or 2 tsp dried rosemary

Mix the water, sugar, and yeast in a stand mixer bowl. Add the rest of the ingredients and mix with a dough hook until smooth, or mix together by hand and knead on a floured surface until smooth. Let rise for 20 minutes then cut into four equal pieces and shape each into baguette form. Place either in greased baguette trays or on a greased sheet pan, and let them rise until doubled, another 30 minutes or so.
Preheat the oven to 425 degrees when you set the loaves for the second rise.
When the loaves have risen and the oven is warm, brush the tops with an egg white wash, and score the loaves with a sharp knife.
Bake until golden brown and hollow tapping, 20 minutes or so. Let cool and enjoy.

I took extra over to the Spring feast, and the texture on this loaf was great. Here's a picture of it with the lamb stew.

So that is it. It was a great dipping bread, and I saved one to have ham and cheese on tomorrow!
Enjoy!

I'm excited to share some news!

If you want to learn how to bake artisan bread with a no fail method, use deconstructing techniques, AND make some recipes that create stunning reconstructed meals- cross your fingers for me. The book proposal has been in the hands of an agent that I would LOVE to be with, and I am hoping for good news. Five more weeks  of potential waiting, I hope I can learn some patience. LOL
So far the recipe development has been fun- here is a sneak peak at one of the finished pictures.
Also in development is a YouTube site, intending to be used as a instructional area where you can find me teaching an demonstrating cooking and baking techniques.  Got a question? Want to know how to torch a cream brulee, or shape a baguette? Just mention it in the comments, and I will get on it!
Hoping that things are exciting and creative in your lives also.
Live Peacefully. Cook Fearlessly.

Chris


Mar 13, 2016

I've got "Star"bread in my eyes!

A few years ago, I was cruising through some recipes on the Internet, and stumbled across one for a chocolate almond butter Starbread.  I am not a fan of the sweet stuff, I am much more a savory girl that the flavors didn't appeal to my taste buds. But, the shape was so darn cute, I had to make it!  I did, and took it to a family reunion, and got rave reviews. So, I returned to the kitchen and turned the basic idea into MY type of Starbread.

 Here are the basics on how to make this addicting bread.
You will need:
A batch of  your favorite pizza dough, or you could use store bought pizza dough (the round ball kind, not the "stuff" in the pop open tubes.)

For the filling:
A splash of olive oil to saute in                        1 medium onion, diced
4-6 cloves of garlic, diced                                4 cups of spinach, roughly chopped
1 cup ricotta                                                      1/2 tsp dried basil
1/3 cup Parmesan cheese                                  Pepper and salt
A drizzle of good balsamic vinegar

Preheat your oven to 425 degrees while preparing this recipe.
Start by making the pizza dough ( I'll give my recipe at the end of this blog.) While the dough is rising, make the filling. Saute the onions in about 3 tbsp of oil for 3 minutes, then add in the garlic and saute for 2 more minutes. Finally, add in the spinach, salt and pepper, and saute until the spinach is wilted and the onions are translucent. Add the drizzle of balsamic vinegar to the spinach mixture, stir in well.Remove from the heat, and let cool for a bit.
Only three doughs, not four!

 Meanwhile, mix the ricotta, the basil, and the Parmesan cheese in a small bowl.  Add the  slightly cooled spinach mixture to the ricotta and mix in very well.  Your mouth should be watering at this point from the aroma!


Next turn out the pizza dough on a floured surface, and divide into 3 equal portions. Roll each into a ball and let sit, covered for 5 minutes. Roll out each of the dough pieces to a 10 inch circle. You will need to roll out, stretch, let rest for a minute ( I work on the other two pieces during this time,) and repeat until the gluten relaxes and you can get the circles to 10 inches or so.

Once you have your three pizza circles, you will need a small bowl with water and a small brush or your fingers.
 On parchment paper or a baking sheet, lay out one circle and brush the outer 1/2 inch of the dough with water. Spread 1/2 of the ricotta mixture on the dough, staying away from the edge by 1/2 inch. Place the second pizza circle on top of the first, and with your fingers seal the edges together, On the second layer, repeat  brushing the water to the outer 1/2 inch, and spread the remaining filling on the second circle. Place the last circle on top of the other two, and seal. On this final  sealing, I make sure that all three layers are good and together.
Now for the shaping of the bread itself. Put a small bowl, upside down in the middle of the bread, just let it sit there. It is going to be the guide for where to end each cut.
Using a sharp knife, cut the bread into 16 wedges. I cut it into quarters first. then eighths, then sixteenths, to try to keep them even.


 Starting anywhere on the bread- brush a little water around the outside 1/2 inch of dough. Take a wedge of the bread, and twirl it to the RIGHT for two turns and flatten out the end tips. Going to the wedge immediately clockwise to the first, take that wedge and twirl it to the LEFT for two turns. Flatten out the bottom end points and seal the middle of the two wedges together. Move to the next set of wedges and repeat, sealing the middle of the endpoints, and also the two points that have been twirled together.
 You should be able to see the pattern emerging. Don't worry if the twisted wedges don't touch in the middle, they will rise in the oven. Do be sure that within each pair, one twist is to the right and one to the left so they are mirror images. And be sure that the endpoints at the bottom are well sealed. Continue around the bread in this fashion until all of the wedges have been twirled, and the endpoints sealed.


At this point, I like to take a 1/4 cup of oil, and add some garlic powder and dried parsley to it. Using a pastry brush, brush the oil over the crust of the bread. Slide the parchment on a pizza peel and into the 425 degree oven onto a baking stone if you have one.  Otherwise, just put the sheet pan with the bread on it into the oven.  Bake at 425 for six to seven minutes, and then lower the oven to 360 and continue to bake. The bread will become crusty and golden brown- check the bottom to gauge doneness. When the top taps hollow a bit, I check the temperature of the middle. I like to use thermometers- I find I get a better consistent product each time with them. Bread is usually done when the internal temp is around 200 degrees.


And you have it!


I like to serve mine with a simple garlic butter for dipping. You can make it as garlick-y as you want. Or I think some canned marinara would be a classic sauce to use as well.


Enjoy!


My quick pizza dough:
1 cup warm water
1 tsp sugar
1 package yeast
3 cups bread flour
1 tsp salt
a little dried Italian seasoning

Mix together the water, sugar and yeast. After proofing, add the flour and the salt, mix well in a mixer with a dough hook, or by hand. Knead for five to six minutes, then oil and put in a bowl to rise. Rise for 15 minutes, then start the shaping as above.

Just a quick book update- the proposal is done and I will be sending it out on Monday- so any good thoughts are appreciated! I am so excited about the quality of the meals in my cookbook- they will look and taste good on anyone's table.
As Always... Live Peacefully. Cook Fearlessly.
Chris

Mar 10, 2016

Jumping off the plank and into the fire

(Note: this is a great one from 2 years ago- and I use the boards all summer. A new blog recipe is in the works, first trial done tonight, and it was yummy!  Just a ferw things to tweak and it will be out on Sunday. Want a picture preview? Click here. )

  While searching down a killer pulled pork recipe for a friend's dinner party,  I stumbled across grilling on a wooden plank.  These planks come in different woods: cedar, oak, hickory, maple were just a few I found.  Well, this inspired me to see what I could do.  
First off,  I found LOTS of boards on Amazon... but how to choose?  And, as many of my friends will attest too, when I get an urge to try something... in the very whiny, immortal words of Veruca Salt  (how's that for an obscure reference!  :)  "I want it, and... I waaannnt it NOW!"


Fresh from the soak
So off to Lowes... who just happened to have Cedar planks in their grilling section, I really wanted the hickory ones, but I live in the boonies.. and beggars can't be choosers. ( Or they have to wait for the Amazon Prime to get to their house  :)  I looked up a few recipes for ideas, but most all featured salmon, and neither the hubby or I can stomach fish . (Unless you count minced, heavily battered, deep fried and smothered in tartar sauce yumminess) I soaked the planks under water with salt added for a few hours.  At the appropriate time, I took the planks out of the water and "toasted" them on the fire. You are supposed to hear some crackling from the boards when they are toasted enough.
When I heard that I took them off the grill and lightly brushed some canola oil on them. WOW -did that aroma smell good, just like a campfire...

Toasted and brushed with canola oil
After heavily seasoning the hamburger patties with good ole sea salt and pepper, both sides! I put the patties on the grill and cooked 3 minutes or so each side to brown them. ( I rushed this a bit, the heat was a little low- next time I will really let them get brown and crispy!) 

Waiting to go onto the rolls
Then the patties were transferred to the planks and put over indirect heat in the grill. I tried to keep the middle burner on only and the grill at about 350 degrees.  It took about 5 minutes each side to get the burgers to well done. I usually like them rare, but I really wanted to try out the cedar taste.  Then, I melted cheese on the burgers and called over the men to try.  The last picture shows the final result and our supper for tonight.  The burgers were very well seasoned- and had a faint undertone of the cedar.  It was better than I had hoped... frankly I was a little afraid that I was going to end up with a hamburger that tasted like those pine tree car fresheners smell like... Yuck!  Its definitely going on the "must be made again" list.  I already have other ideas of hamburgers and combinations...  Maple board hamburger with cheddar cheese and grilled onions.....Hickory board with Swiss cheese, fresh coleslaw, and pickles... ahh the list goes on and on.


And, ps- the rolls are handmade too. I tried an new idea out this afternoon with a quick rise , 90 minutes start to finish.  This is definitely a keeper too- I always know its a hit when the hubby tells me how good something is... he's a bit (that a real understatement! ) picky about his food.

 So I think that everyone should try this!  Or let me know if you have tried other woods that I don't know about yet. 

As always- Live Peacefully and Cook Fearlessly!                                        Chris