A few years ago, I was cruising through some recipes on the Internet, and stumbled across one for a chocolate almond butter Starbread. I am not a fan of the sweet stuff, I am much more a savory girl that the flavors didn't appeal to my taste buds. But, the shape was so darn cute, I had to make it! I did, and took it to a family reunion, and got rave reviews. So, I returned to the kitchen and turned the basic idea into MY type of Starbread.
Here are the basics on how to make this addicting bread.
You will need:
A batch of your favorite pizza dough, or you could use store bought pizza dough (the round ball kind, not the "stuff" in the pop open tubes.)
For the filling:
A splash of olive oil to saute in 1 medium onion, diced
4-6 cloves of garlic, diced 4 cups of spinach, roughly chopped
1 cup ricotta 1/2 tsp dried basil
1/3 cup Parmesan cheese Pepper and salt
A drizzle of good balsamic vinegar
Preheat your oven to 425 degrees while preparing this recipe.
Start by making the pizza dough ( I'll give my recipe at the end of this blog.) While the dough is rising, make the filling. Saute the onions in about 3 tbsp of oil for 3 minutes, then add in the garlic and saute for 2 more minutes. Finally, add in the spinach, salt and pepper, and saute until the spinach is wilted and the onions are translucent. Add the drizzle of balsamic vinegar to the spinach mixture, stir in well.Remove from the heat, and let cool for a bit.
 |
| Only three doughs, not four! |
Meanwhile, mix the ricotta, the basil, and the Parmesan cheese in a small bowl. Add the slightly cooled spinach mixture to the ricotta and mix in very well. Your mouth should be watering at this point from the aroma!

Next turn out the pizza dough on a floured surface, and divide into 3 equal portions. Roll each into a ball and let sit, covered for 5 minutes. Roll out each of the dough pieces to a 10 inch circle. You will need to roll out, stretch, let rest for a minute ( I work on the other two pieces during this time,) and repeat until the gluten relaxes and you can get the circles to 10 inches or so.
Once you have your three pizza circles, you will need a small bowl with water and a small brush or your fingers.

On parchment paper or a baking sheet, lay out one circle and brush the outer 1/2 inch of the dough with water. Spread 1/2 of the ricotta mixture on the dough, staying away from the edge by 1/2 inch. Place the second pizza circle on top of the first, and with your fingers seal the edges together, On the second layer, repeat brushing the water to the outer 1/2 inch, and spread the remaining filling on the second circle. Place the last circle on top of the other two, and seal. On this final sealing, I make sure that all three layers are good and together.


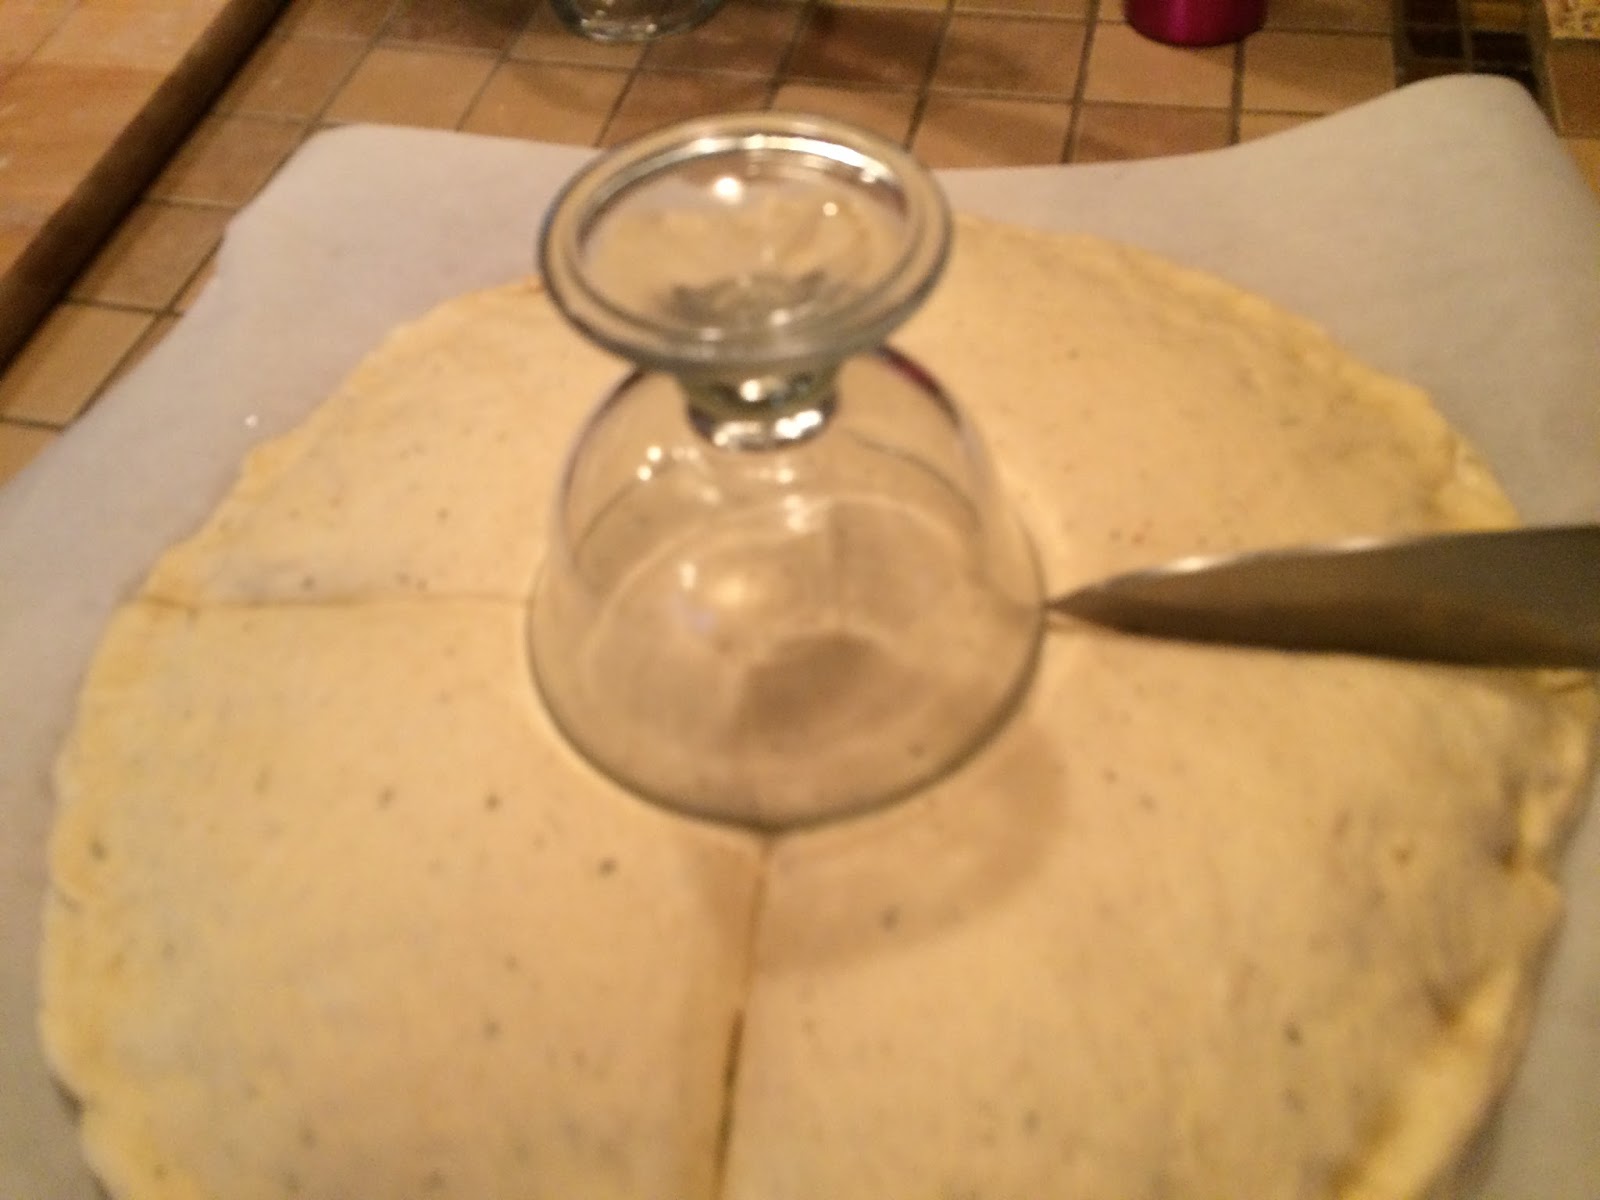
Now for the shaping of the bread itself. Put a small bowl, upside down in the middle of the bread, just let it sit there. It is going to be the guide for where to end each cut.
Using a sharp knife, cut the bread into 16 wedges. I cut it into quarters first. then eighths, then sixteenths, to try to keep them even.
Starting anywhere on the bread- brush a little water around the outside 1/2 inch of dough. Take a wedge of the bread, and twirl it to the RIGHT for two turns and flatten out the end tips. Going to the wedge immediately clockwise to the first, take that wedge and twirl it to the LEFT for two turns. Flatten out the bottom end points and seal the middle of the two wedges together. Move to the next set of wedges and repeat, sealing the middle of the endpoints, and also the two points that have been twirled together.
You should be able to see the pattern emerging. Don't worry if the twisted wedges don't touch in the middle, they will rise in the oven. Do be sure that within each pair, one twist is to the right and one to the left so they are mirror images. And be sure that the endpoints at the bottom are well sealed. Continue around the bread in this fashion until all of the wedges have been twirled, and the endpoints sealed.


At this point, I like to take a 1/4 cup of oil, and add some garlic powder and dried parsley to it. Using a pastry brush, brush the oil over the crust of the bread. Slide the parchment on a pizza peel and into the 425 degree oven onto a baking stone if you have one. Otherwise, just put the sheet pan with the bread on it into the oven. Bake at 425 for six to seven minutes, and then lower the oven to 360 and continue to bake. The bread will become crusty and golden brown- check the bottom to gauge doneness. When the top taps hollow a bit, I check the temperature of the middle. I like to use thermometers- I find I get a better consistent product each time with them. Bread is usually done when the internal temp is around 200 degrees.
And you have it!
I like to serve mine with a simple garlic butter for dipping. You can make it as garlick-y as you want. Or I think some canned marinara would be a classic sauce to use as well.
Enjoy!

My quick pizza dough:
1 cup warm water
1 tsp sugar
1 package yeast
3 cups bread flour
1 tsp salt
a little dried Italian seasoning
Mix together the water, sugar and yeast. After proofing, add the flour and the salt, mix well in a mixer with a dough hook, or by hand. Knead for five to six minutes, then oil and put in a bowl to rise. Rise for 15 minutes, then start the shaping as above.
Just a quick book update- the proposal is done and I will be sending it out on Monday- so any good thoughts are appreciated! I am so excited about the quality of the meals in my cookbook- they will look and taste good on anyone's table.
As Always... Live Peacefully. Cook Fearlessly.
Chris
 e with instructions but I was able to find some on the Internet a few years ago, and they were still in the box.


 d I saw my other favorite kitchen gadget- the Breakfast Sandwich Maker- and an idea popped up!


